The current version of the Sparkfun BWSN Basics Kit [1] includes a TMP36 temperature sensor in place of the LM335 sensor described in the Building Wireless Sensor Networks [2] book. To use this component, simply replace the instructions on page 147 with the following:
Temperature input
This project uses the TMP36 low-voltage analog temperature sensor. This sensor has a linear output of +10 mV per degree Kelvin and it comes pre-calibrated. You can get the entire data sheet for the TMP36 at:
http://www.analog.com/static/imported-files/data_sheets/TMP35_36_37.pdf [3]:
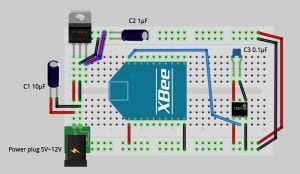
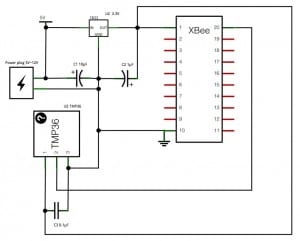
- The TMP36 temperature sensor has three leads. When the sensor’s flat side is facing you, the leads from left to right are positive, output and negative. Insert the TMP36 so that each lead is in its own row on the breadboard.
- Use a red wire to connect the leftmost, positive lead to one of the power rails.
- Use a black wire to connect the rightmost, negative lead to one of the ground rails.
- Insert 0.1uF capacitor so that it’s connected as close as possible to the TMP36 power lead on one end and to its negative lead on the other. This will help suppress any noise in the circuit.
- Use a jumper wire to connect between the center output lead to XBee digital input 0 (physical pin 20).
Program
Download this updated Simple_Sensor_Network.zip [4] program for Processing. To use the TMP36, uncomment its code (around line 100) and comment out the LM335 code (around line 92).
Fritzing [5] breadboard layout
Fritzing [5] schematic
TMP36 data sheet
from Analog Devices

